There’s nothing quite like the satisfaction of biting into a perfectly cooked steak. But achieving that ideal level of doneness can be tricky, even for experienced grillers. For the best steaks at home, it’s essential to cook to the right temperature based on personal preferences. Achieving the desired temperature is crucial, and using a digital meat thermometer ensures accuracy for the perfect steak.
In this comprehensive guide, we’ll explore four foolproof methods to determine steak doneness, from high-tech tools to simple tricks you can master with practice. We’ll also provide a handy steak temperature chart and share expert tips to elevate your grilling game.
Why Steak Doneness Matters
Before we dive into the methods, let’s quickly cover why getting your steak’s doneness right is so important:
- Flavor and texture: Proper doneness ensures the best taste and mouthfeel for your preferred level of cooking.
- Food safety: Knowing your steak’s internal temperature helps prevent foodborne illness.
- Consistency: Mastering doneness techniques, including understanding the specified internal temperature, leads to reliably great results every time you grill.
- Customization: Different cuts and preferences require different levels of doneness for optimal enjoyment.
Now, let’s explore the four best methods to tell when your steak is done.
Understanding Steak Doneness
Steak doneness refers to how thoroughly a steak is cooked, which significantly impacts its texture, flavor, and overall quality. Achieving the perfect steak means understanding the different levels of doneness and the corresponding internal temperatures. Whether you prefer a rare steak with a cool, red center or a well done steak with no pink, knowing the right temperature is key.
Using a meat thermometer is the most accurate way to gauge steak doneness. For instance, a medium rare steak should reach an internal temperature of 130°F – 135°F (54°C – 57°C), offering a warm, red center. On the other hand, a well done steak should hit 160°F – 170°F (71°C – 77°C), ensuring it’s cooked through with little to no pink. The USDA recommends cooking steaks to at least 145°F (63°C) for medium doneness to ensure food safety, but personal preference plays a significant role in determining the ideal internal temperature for your perfect steak.
Method 1: Using a Wireless Meat Thermometer
The most accurate way to determine steak doneness is by using a high-quality meat thermometer. Wireless models offer the added convenience of monitoring your steak’s temperature without hovering over the grill.

One excellent option is the ThermoPro TP20 Wireless Meat Thermometer. This dual-probe thermometer allows you to monitor two steaks simultaneously or track both meat and grill temperatures.
Key features of the ThermoPro TP20:
- 300 ft wireless range
- Dual probe design
- Preset temperatures for various meats and doneness levels
- Large, backlit LCD display
To use a meat thermometer:
- Insert the probe into the thickest part of the steak, avoiding fat or bone.
- Wait for the temperature to stabilize (usually 2-3 seconds for instant-read models).
- Compare the reading to the steak temperature chart below.
Remember to clean your thermometer probe between uses to prevent cross-contamination.
Steak Temperature Chart
Use this chart as a guide for target internal temperatures based on desired doneness:
| Doneness | Internal Temperature | Description |
|---|---|---|
| Rare | 125°F (52°C) | Red, cool center |
| Medium Rare | 135°F (57°C) | Red, warm center |
| Medium | 145°F (63°C) | Pink center |
| Medium Well | 150°F (66°C) | Slightly pink center |
| Well Done | 160°F (71°C) | Little to no pink |
Note: The USDA recommends cooking steaks to a minimum internal temperature of 145°F (63°C) for food safety. Consuming undercooked meat may increase the risk of foodborne illness.
A steak cooked to perfection depends on achieving the ideal temperatures for various doneness levels, and this chart helps ensure a juicy and tender steak.
Method 2: The Touch Test (Finger Test)
While not as precise as using a thermometer, the touch test is a popular method among experienced chefs and grillers. This technique involves comparing the firmness of your steak to different parts of your hand.
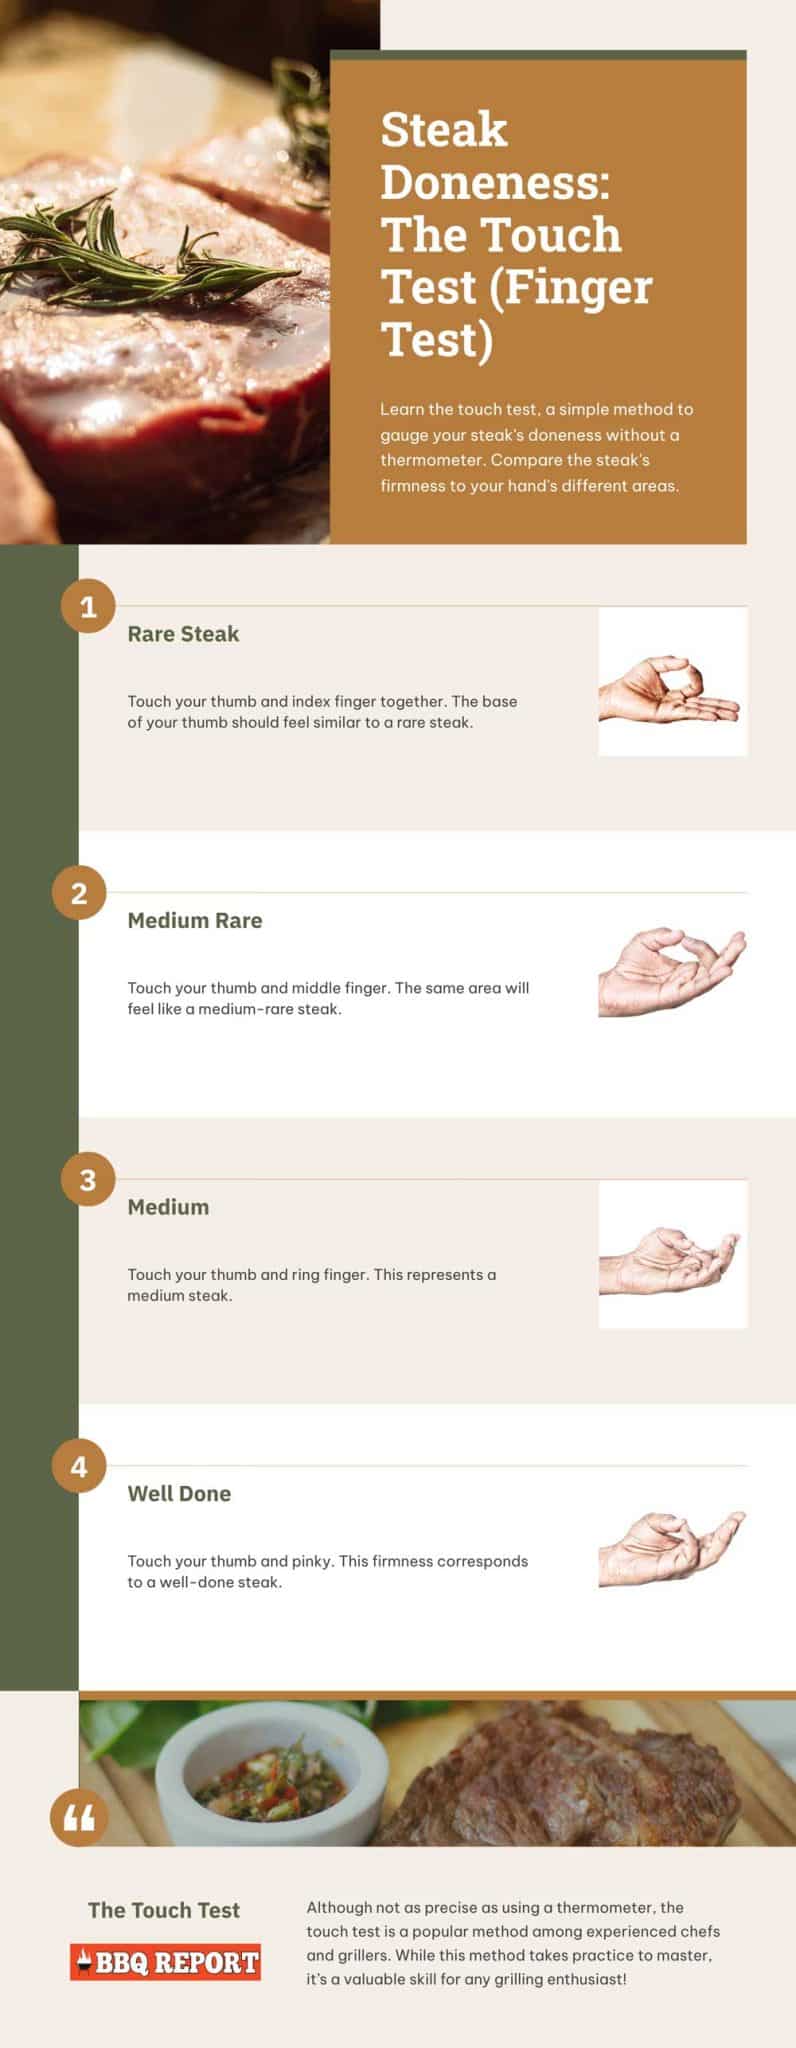
Here’s how to perform the touch test:
- Relax your non-dominant hand, palm up.
- Press the steak with the index finger of your other hand.
- Compare the steak’s firmness to these hand positions:
- Rare: Touch your thumb and index finger together. The fleshy part at the base of your thumb should feel similar to a rare steak.
- Medium Rare: Touch your thumb and middle finger. The same area will feel like a medium-rare steak.
- Medium: Touch your thumb and ring finger. This represents a medium steak.
- Well Done: Touch your thumb and pinky. This firmness corresponds to a well-done steak.
While this method takes practice to master, it’s a valuable skill for any grilling enthusiast.
Method 3: Visual Cues
Observing your steak’s appearance can provide clues about its doneness, though this method is less reliable than using a thermometer or the touch test.
Look for these visual indicators:
- Rare: Red center, cool to the touch
- Medium Rare: Red center with a warm pink ring around the edges
- Medium: Mostly pink with a thin ring of brown around the edges
- Medium Well: Mostly brown with a thin pink line in the center
- Well Done: Entirely brown throughout
Keep in mind that different cuts and grades of beef may look slightly different at the same level of doneness.
Method 4: Timing Method
While not the most accurate, the timing method can be useful when combined with other techniques. Cooking times will vary based on steak thickness, grill temperature, and desired doneness.
Here’s a general guide for a 1-inch thick steak on a preheated grill (450-500°F):
- Rare: 3-4 minutes per side
- Medium Rare: 4-5 minutes per side
- Medium: 5-6 minutes per side
- Medium Well: 6-7 minutes per side
- Well Done: 8+ minutes per side
Always use visual cues and/or a meat thermometer in conjunction with timing for best results.
Resting Your Steak
Resting your steak is a crucial step in the cooking process that many overlook. After removing your steak from the heat source, let it rest on a plate or cutting board at room temperature. This resting period, typically about 5-10 minutes, allows the juices to redistribute throughout the meat, ensuring a tender and flavorful steak.
The general rule of thumb is to rest your steak for half of its cooking time. For example, if you cooked your steak for 10 minutes, let it rest for about 5 minutes. This step is essential because if you cut into the steak immediately, the juices will escape, leaving you with a dry and less flavorful piece of meat. Resting also allows the internal temperature to stabilize, ensuring your steak is cooked to the desired doneness.
Carryover Cooking and Grilled Reverse-Sear Method
Carryover cooking is a phenomenon where the internal temperature of a steak continues to rise even after it’s removed from the heat source. This happens because the heat from the exterior of the steak transfers to the interior, causing the internal temperature to increase by a few degrees. It’s important to account for this when cooking to avoid overcooking your steak.
One effective technique to manage carryover cooking and achieve a perfectly cooked steak is the grilled reverse-sear method. This method involves cooking the steak at a low temperature first, then searing it at a high temperature to create a crispy crust. Start by cooking your steak at a low temperature (around 225°F – 250°F or 107°C – 121°C) until it reaches your desired internal temperature. Then, sear the steak at a high temperature (around 450°F – 500°F or 232°C – 260°C) for 1-2 minutes per side to achieve a delicious, crispy exterior.
By understanding carryover cooking and utilizing the reverse-sear method, you can ensure your steak is cooked evenly with a tender interior and a perfectly seared crust. This approach is particularly effective for thicker cuts, helping you achieve the ideal balance of texture and flavor.
Tips for Perfectly Cooked Steaks
- Let your steak come to room temperature before grilling (about 30 minutes). This ensures the entire steak is the same temperature throughout, contributing to even cooking and preventing the exterior from overcooking while the interior remains cold.
- Pat the steak dry with paper towels to promote better searing.
- Season generously with salt and pepper just before cooking.
- Use tongs to flip your steak, not a fork, to avoid piercing and losing juices.
- Let your steak rest for 5-10 minutes after cooking to allow juices to redistribute.
- For thicker steaks, consider the reverse sear method for more even cooking.
Frequently Asked Questions
Is it safe to eat rare steak?
While many people enjoy rare steak, it does carry a slightly higher risk of foodborne illness. The USDA recommends cooking steak to a minimum internal temperature of 145°F (63°C) for safety.
How can I tell if my steak is medium-rare without cutting into it?
The most accurate method is using a meat thermometer (135°F / 57°C for medium-rare). The touch test and visual cues can also be helpful with practice.
Why should I let my steak rest after cooking?
Resting allows the juices to redistribute throughout the steak, resulting in a more tender and flavorful eating experience. Aim for 5-10 minutes of rest time.
Can I use these methods for all types of steak?
Yes, these methods work for most cuts of steak. However, keep in mind that thicker cuts may require longer cooking times and different techniques (like reverse searing) for best results.
What’s the best way to check doneness for a thick steak?
For steaks thicker than 1.5 inches, a meat thermometer is the most reliable method. Insert it horizontally into the side of the steak for the most accurate reading.
Conclusion
Mastering the art of determining steak doneness takes practice, but it’s a valuable skill for any grilling enthusiast. While a high-quality meat thermometer like the ThermoPro TP20 offers the most precise results, techniques like the touch test and visual cues can be handy alternatives.
Remember to consider factors like steak thickness, grill temperature, and personal preference when aiming for your ideal level of doneness. With these methods and tips in your grilling arsenal, you’ll be serving up perfectly cooked steaks in no time.
Happy grilling!
Contents
- Why Steak Doneness Matters
- Understanding Steak Doneness
- Method 1: Using a Wireless Meat Thermometer
- Steak Temperature Chart
- Method 2: The Touch Test (Finger Test)
- Method 3: Visual Cues
- Method 4: Timing Method
- Resting Your Steak
- Carryover Cooking and Grilled Reverse-Sear Method
- Tips for Perfectly Cooked Steaks
- Frequently Asked Questions
- Conclusion